1. SOCIAL LISTENING: INTRODUCTION

Social Listening is the ultimate monitoring tool that keeps track of users conversations on social media and provides precious insights about discussion topics, users’opinions, and content engagement levels on both owned and earned media.

1.1 A complete suite

Social Listening is part of the Blogmeter Suite, an integrated platform that allows you to find out what is being said online about brands, products, services and people, to measure the social performance of company profiles and to identify the right influencers for specific industries. For more information on our Suite, visit our Website.


1.1
1.1 Blogmeter Suite – Drop down menu

1.2 Why Social Listening

Have you ever dreamed of:

  • analysing consumer preferences and market trends?
  • understanding the perception of brands, products, people and topics?
  • measuring your marketing campaigns performance?
  • identifying influencers and evaluate their effectiveness?
  • performing competitive benchmarking activities?
  • receiving automatic alerts and keeping sensitive contents under a tight watch?

All this with just one integrated tool? Then Social Listening is for you.


1.2
1.2 Social Listening homepage (Overview)

1.3 Key Features

KPI Overview: keep track of conversations mentioning your brand and monitor their progress during the analysed period, identifying the most active moments. Obtain an immediate overview of key performance indicators.

Comparative Analysis: analyse your online reputation and monitor the performance of messages related to your brand and competitors. Identify the most discussed topics and compare KPIs with those of your competitors.

Sources and Discussion Topics: based on your analysis, discover the most active sources and their share of voice. Identify the most popular concepts, terms and hashtags used to talk about your brand.

Sentiment Analysis: Blogmeter’s automatic sentiment enables the analysis of sentiment opinions associated to your brand, your competitors, campaigns and your testimonials/influencers of reference. Discover what is being said, how often and where in order to reinforce your strategic planning.

Post Classification: through an advanced tagging system, analyse and classify post contents and visualise their engagement. Thanks to the BM Rank you can assess the relevance of authors across all sources.

Celebrities and Influencers: identify the most relevant influencers within the industry of your choice, their fan/follower base and their engagement. Discover the most active authors among messages analysed and profile them by gender and geographic location.


1.4 How to log in?

You can access to all features by clicking the following link: https://suite.blogmeter.it/sl and entering your credentials.
We recommend to use Chrome or Firefox as browsers.


LogIn_1.4
1.4 Blogmeter Suite log in page
FOCUS: Social Listening structure and main functions

Social Listening is made up of the following sections, selectable from the top blue menu bar:

    1.  Overview
    2.  Comparison
    3.  Sources
    4.  Sentiment
    5.  Authors
    6.  Posts


1.5 Any doubts on definitions?

Go to our Vocabulary for more details. Otherwise, let’s dive into the world of social listening.

2. OVERVIEW

Do you need the big picture when it comes to conversations about your brand? Do you want to monitor all the most significant metrics and their evolution on a single page? Are you running out of time and want to know your brand reputation at a glance? Have a look at the Overview section to learn how.

2.1 Overview

On the Overview page, you can visualise the main metrics on the brands and topics that you are currently analysing. This first page allows you to examine the conversations about your brand, to follow their evolution during relevant time periods and to spot peaks of activity.


2.1
2.1 Social Listening Overview page

FOCUS: Overview structure and main functions
  1.  Deep-dive in your data through the tab sections
  2.  Customise your research through the filter toolbar on the left side of the screen: choose time frame, sources, brands
  3.  Customise your charts and download them
  4.  Identify the most common hashtags and words
  5.  Discover the most discussed threads
  6.  Customise your search with specific keywords


2.1_chart menu
2.1 Chart menu and Advanced Search

2.2 Filter toolbar

The filter toolbar provides you with infinite possibilities in terms of data customisation and visualisation. In addition, a dedicated team will support you to create and develop your project according to your needs.

FOCUS: Filter toolbar
  1.  Display your data in real-time
  2.  Save your searches as preset filters
  3.  Select the time period of your analysis and customise the comparison period
  4.  Select or exclude specific types of sources (blogs, news, forums, social networks…)
  5.  Discover the most significant sources through the BM Rank*
  6.  Choose a specific language, market, type of post and author gender through the advanced filters
  7.  Analyse the specific brands and topics you are interested in

*BM Rank: proprietary metric indicating the significance of each source on a scale from 1 to 10 (1=lowest; 10=highest, see Vocabulary for details).

2.3 Brands, topics and owned channels classification

Using the left toolbar, you can visualise the customised set of brands, products, campaigns, topics and owned channels that pertain to your specific monitoring project. This classification could be created in partnership with Blogmeter’s analysts, helping you meeting your business needs. For example, you might want to monitor conversations and metrics regarding your brand vs. a set of competitors, your specific products, the results of your campaigns, some topics of interest regarding your brand or your products, as well as evaluate the buzz generated by your own communication strategy.


USER TIPS: How to use filters toolbar

I’m a carmaker, and I need to monitor my customers reactions related to the launch of our new model and immediatly identify any criticism. How can I do it?
Blogmeter Social Listening gives you the chance to answer to your business needs.

  1.  Customise the period of analysis by setting the relevant dates by the date dropdown menu, then click “Apply”
  2.  Select the relevant sources, if needed, and click “Apply”
  3.  Select the relevant markets and languages, if needed, and click “Apply”
  4.  Select the name of your product from the tree menu and click “Apply”


2.4 How to search documents inside your project

If you want to refine your search, you just need to click the magnifying glass icon on the top right corner. You may click on the small arrow to show a list of search shortcuts such as boolean operators, sources search, hashtags search and so on; the user may type directly any command or click on the buttons to select the operator and just type the term, author name, hashtag, source, etcetera.


BASIC FUNCTIONALITIES


Using the search bar

The search bar can be recalled by clicking on the button.

Click on the search bar to type any term, sentence or search shortcut (such as author: or hashtags:, using (if needed) multiple boolean logic operators such as NOT, AND, OR.

A click on the icon on the right end of the search bar will activate a graphical interface that aids the user in writing boolean operators or search shortcuts.

More experienced Blogmeter Suite users can directly type commands or operators without using this graphical interface: if typed correctly, the search results will be identical.

Boolean Operators


  • AND: while not explicitly stated or visible, any multiple (i.e. more than one) command or term inserted in the search bar will apply the AND operator.
    example of usage: fat cat will display all messages containing the words “fat” and “cat”, unrelated to the positional proximity of the terms.
  • NOT shows all documents that do not contain the keyword entered in the search box. It is applied by using a – (minus) symbol: -vanilla, -“chocolate cake”. It can be combined with the Exact Text functionality.
    example of usage:  -marketing , -“Thomas Edison”-author:name ,    -source:facebook-“The sky is blue”
    Please Note: in large Social Listening projects, any NOT command may result in longer waiting times as the system scans all the documents available before showing the user the ones that do not contain the specified term or search shortcut.
  • OR shows all documents that include either of the two terms or both.
    example of usage:  lancome OR sephora , Enel OR Edisonauthor:chiaraferragni OR author:nablacosmetics   

SEARCH SHOTCUTS


List of Search Shortcuts

  • Exact Text shows all documents for the exact combination of letters and spaces within the ” ” characters (neutral double quotes)
    example of usage: “Thomas Edison”“the quick brown fox”“my favourite colour is #blue” , “Skyactiv-X”
  • Title : search only in the titles of the documents (and not in the documents’ content)  ; the basic boolean operators can be used.
    example of usage: title:”now on tv” , title:”i programmi di oggi in tv”   
  • Content : search only in the contents of the documents (and not in the documents’ title); the basic boolean operators can be used. Please remember that the text of a comment is is considered as a content field.
    example of usage:  content:sky  ,  content:”this lancomeofficial campaign”  ,  -content:sky   ,  -content:”this lancomeofficial campaign” 
  • Author : search all documents by authors’ names entered in the box; the basic boolean operators can be used.
    example of usage:  author:nowtv_itauthor:”Jane the chef”
  • Hashtags : search all documents that contain the hashtag(s) entered in the box; the basic boolean operators can be used.
    example of usage:  hashtags:nowtv-hashtags:nowtv
  • Source : search all documents published by the source type or source detail entered in the box; the basic boolean operators can be used.
    example of usage: source:facebook  ,  source:”sky italia”  , source:radiodeejay

Please note: Adding an asterisk * (also called wildcard) to a desidered “stem” can ask the system for all the words beginning with that “stem”. This function may be used many times, as with the following example search command: pagam* OR pacchett* OR abbona*.

QUICK FAQs

  1. Can I input more than one research command at the same time (e.g. author:chiaraferragni AND lancome) ? Yes. All commands inserted will be shown as a single navigational filter in the upper navigation window and they will be active at the same time. Example:
    The AND command (and only this type of command) can actually be skipped, it will still work:
  2. I input more than one research command at the same time (e.g. author:chiaraferragni AND lancome) but I’ve changed my mind. Can I delete a single command such as Lancome and leave the other as active?
    No, as all commands are considered at a whole, so you have to delete all the previous commands and make a new one.
  3. Can I create a search query that uses both NOT and OR operators, such as -(author:chiaraferragni author:fedez)? 
    No, in this case the search system will apply only the first NOT operator. If you want to exclude these two authors, you have to write -author:chiaraferragni -author:fedez in the search bar.
  4. I wrote NOT makeup and, in Social Listening, I still see comments that do not mention “makeup” but that actually mention the keyword in the original post’s title.
    This is because comments are considered as separate texts; since they don’t mention the keyword, what you’re seeing is a correct result.  In fact, even if you can see the comment with an original title that mentions “makeup”, the original post will not be visible in the results.
  5. I put some terms or sentences in NOT and the tool won’t load the results instantly. Why so? 
    In large Listening or Analytics projects, any NOT command may result in longer waiting times as the search system scans all the documents available before showing the user the ones that do not contain the specified term or search shortcut.
  6. Is the “term stemming” process enabled by default ?
    No, stemming is enabled only by specifying first a desired language within the related button in the left column of the Suite interface.
  7. Is there a Lemmatization function? 
    Our search software doesn’t apply lemmatization processes (i.e. It does not recognize the tenses of verbs, people names, etc.). e.g. You’ll get no reverse-lemmatized results such as “payment” as a result of a search for the keyword “pay” or, in Italian, “pagare” for “pago”.
    For stemmable words, it’s advisable to use the wildcard *, e.g.  pay* , watch* , pag* , cost* and so on.
  8. Can I stack together Boolean Operators and Search Shortcuts together?
    Yes, all the search shortcut commands can be used with the boolean  operators. Example: -Hashtags:nowtv , -author:nowtv_it , author:sky OR author:nowtv   , source:facebook AND author:”sky italia”
  9. I applied a Language Filter in Social Listening and the search system seems to ignore some of my searches, like “once” or “tutto”, bringing zero results. Why so?
    You may have written a so-called Stopword. A stopword is a term that is too generic to bring satisfying search results (such as the, or, and in English or ad, allo, quello, stai in Italian). A list of stopwords is available for Italian at this link and for English at this link (other languages lists are available on request).
    When any language filter is active, stopwords in search queries will be ignored. E.g. a search for “quello” in italian will bring 0 results.
    Please be sure not to enable language filters whenever looking for generic expressions like “più generali” or “the product”, as the common word may not be considered and the results may not as complete as expected.
  10. The search system seems to ignore my searches, bringing zero results, whenever I’m looking for numbers. Why so?
    Numbers are ignored by the search system so to avoid too vague and broad results.


2.5 Sentiment filters

You can select all the toned documents related to a brand, by using the sentiment filters on the left-side toolbar:

  •  Click on “All” to activate the sentiment tags
  •  Select the brand of your analysis
  •  Click “Apply”. All posts concerning your brand and classified for a specific sentiment are then displayed on the platform.

If you want to explore the tone of voice of the brand for a specific topic, follow the steps 1 to 3 here above, then click the Topic of your choice, then click “Apply”.

2.6 Advanced operators

It’s possible to further refine your search by activating the advanced operators.

  •  Switch the “Advanced operators” button to green
  •  Select one of the three Boolean operators available on the toolbar (AND, OR and NOT) to combine, sum or exclude filters.
  •  Select the classification filter you want to apply (e.g. brand, product)
  •  You can also select the sentiment (positive, negative, neutral, question or no sentiment)


USER TIPS: How to use Boolean Operators

By clicking the Advanced filters, three Boolean operators will be displayed: AND, OR and NOT. These operators allow you to combine in different ways all the classification filters available in the left-hand toolbar (e.g. brands, products, topics). Let’s have a detailed look at them:

    • AND: it associates two or more class filters, displaying all the documents concerning all the filters simultaneously (Audi AND Design = displays all the documents concerning the design of Audi cars)
    • OR: it adds two or more class filters, displaying all the documents concerning at least one of the class filter selected (Audi OR Alfa Romeo = displays all the documents concerning the Audi or Alfa Romeo)
    • NOT: it exclude a class filter from the panel of documents in the dashboard (NOT Audi = excludes all the documents concerning Audi).

As a default mode, all filters pertaining to different classes are combined with the “AND” operator, while those filters pertaining to the same class are combined with the “OR” operator.

2.7 How to create a Bookmark

Bookmarks resume a specific search and are useful to quickly set at once a series of filters and to create automatic alerts. You can save your bookmark as follows:

  1.  Set the desired filters and keywords on the filter toolbar and search them
  2.  Click “Add a bookmark” on the left-side toolbar
  3.  Name your bookmark
  4.  Click “Create”. Your bookmark will be available in the dedicated dropdown menu


Bookmarks_2.7
2.7 Bookmark creation pop-up

2.8 Charts: main functions

Total Messages, Engagement and Mentions

You can visualise different data sets in each chart by selecting one of the following metrics: Total Messages, Engagement or Mentions. This applies to all graphs, included the Overview one.

  1.  Click the drop-down menu “Total Messages” (default selection on most charts)
  2.  Change the dataset into “Engagement” or “Mentions”
  3.  The chart will adapt according to the selected dataset

If you need clarifications on any metrics, click the informative notes (the “i” button on the right of the graph name) or see Vocabulary.

Trend_2.8
2.8 Trend options
Brands/ Items visualisation

In each chart, you can visualise only the brands/items from the panel of your interest.

  1.  Click the “N^ selected” drop down menu on the top right side of each chart
  2.  Flag or unflag brands/ items that you want to visualise or to exclude from the chart visualisation
  3.  Click “Apply”


Source Type_2.8
2.8 Graph selection
Formatting

Before downloading a chart, you can customise some of its features directly from the Suite.

  1.  Font: customise the font size by clicking the + / – icons in the burger menu on the top right corner of the pop-up window
  2.  Color: customise the color of a series of words in the word cloud based on their size and select two different shades. Click “export graph” in the burger menu to display the word cloud in a pop-up window. Click the burger menu to see the color palette, pick a color and then click “Apply”.


Formatting Options_2.8
2.8 Formatting options
Charts/ Data download

You can download all the charts in Social Listening as follows:

  1.  Click the burger menu icon
  2.  Choose the “Export Graph” option
  3.  You can change the font size by clicking on the + / – icons
  4.  Click the download icon to download the chart (available formats: PDF, PNG, JPEG, SVG)

You can also download the same data in CSV version for further analysis and modification.


3. COMPARISON

Do you want to monitor the performance of your brand and of your competitors through online conversations? Do you need to know what online consumers think about your brand and your competitors? Do you want to find out the most discussed topics concerning your brand and your competitors and identify the point of strength and weakness of your industry? The Comparison section will provide you with complete benchmark functionalities.

3.1 Comparison page

The Comparison page allows you to compare the performances of your brands and products with those of your competitors. It provides you with infinite benchmarking possibilities and gives you the opportunity to take advantage of the full potential of the Suite.


3.1
3.1 Social Listening Comparison page
FOCUS: Comparison structure and main functions
  1.  Select the scope of your analysis from the drop-down menu at the top right corner of the page. You can choose any customised classes (brands, products, topics) as a basis for comparison. The charts displayed will adapt according to the parameter selected.
  2. Visualise the share of voice of each brand (or any other selected class) in your panel by Total messages, Engagement and Mentions. You can also display the brands of interest by clicking the “Top 10” button and selecting only some specific brands (by default, the chart displays the top 10 brands of your panel).
  3. Analyse the content of each brand (or any other selected class) by comparing, for example, the share of voice of topics, products or owned channels for each brand in your panel.
  4. Identify the peaks of conversations and engagement for each brand (or any other selected class) over the period of analysis
  5. Compare the performances of each brand by total messages, engagement mentions, number of sources and impressions displaying them in a single chart. Benchmark the performances of your brand to the market average values.


4. SOURCES

Which sources drive the conversations about your brands and products and which are the most engaging? What is the visibility of the sources that talk about your brand? The Sources section will answer all these questions.

4.1 Sources page

The Sources page let you take a deep dive into the sources of the content you want to analyse.


4.1_Sources
4.1 Social Listening Sources page
FOCUS: Comparison structure and main functions
  1. Identify the peaks of conversations and engagement for each source type over the period of analysis
  2. Visualise the share of voice of each source type and see which source type drive the content you are analysing by Total messages, Engagement and Mentions. You can customise the source types visualised by clicking on the “Top 10” drop down menu and choosing the sources you are interested in
  3. Analyse the main sources talking about your brand and products (social media, specific forums and sites etc.)
  4.  Identify the specific social media profiles and domains for a further deep dive in your source panel

4.2 Source Details: how to use filters

If you want to focus on or exclude any sources, you can use the “Source Details” section of the “Source Tab” (the same filters can be found in the “Authors Tab” as well as in the “Most Discussed” list):

  •  Click the burger menu on the top right corner of the “Source Details” box
  •  Choose the “Filter” option from the drop-down menu. The “OR” and “NOT” Boolean operators appear on the left
  •  Select the “OR” or “NOT” operator
  •  Flag/unflag the sources you want to include/exclude
  •  Click “Apply filter”. You can select a maximum of 10 sources.


4.2_Sources detail filters
4.2 Source Details filters
USER TIPS: How to measure an influencer contribution to a campaign on various sources

In order to identify the contribution of every influencer to a campaign, procede as follows: use the OR operator to select his/her social media channels or blog and display the data concerning his/her cross-channel contribution.
You can save the search in the bookmark section if this is a recurrent analysis.


5. SENTIMENT

Do you want to know how your audience talks about your brands and products? Which sources have expressed the most positive opinions about your brand and which the most negative? Would you like to identify promoters and spot detractors? Go to the Sentiment section to find out how to answers to these questions.

5.1 Sentiment page

The Sentiment page provides you with an overview of the tone of conversations concerning your brand and products. You can also compare the tone of discussions with your competitors. Please note that Sentiment opinions and graphs are available only in case of active automatic sentiment or manual tagging (or both).

Two Sentiment pages are available: Overall Sentiment and In-depth Sentiment.

5.2 Overall Sentiment

In this page you can discover the main sentiment on your project or industry, overall on the whole data set or in details, searching for specific keywords or using filters.

Sentiment_Overall

5.2 Social Listening – Overall Sentiment page


FOCUS: Overall Sentiment structure and main functions

1. Choose your sentiment data analysis: overall or in-depth

2. Discover the main KPIs related to Sentiment data: total number of opinions; positive, negative, and question counts; number of mentions (posts and relevant comments) where the sentiment opinions have been found. Neutral data are optional

3. Examine the evolution of the conversational tone over time and analyse positive and negative opinions peaks

4.  Sentiment at a glance: what’s the main sentiment trend of your project or industry?

5. Compare the tone of the main sources and identify the most positive and negative ones

6. Save sentiment data as .csv

7. Search any keywords or hashtags you are interested in and analyse the sentiment opinions in the document matching your search

5.3 Sentiment Details: how to use filters

The charts of the Sentiment pages can be customised by choosing all the classification filters set on the left menu (brands, products, topics, campaigns, owned channels, etc.).

  •         Click the drop down menu on the top right corner of the page
  •         Choose between the different customised options to focus your sentiment comparison on one of them
  •         Once the new option is set, all the charts change accordingly, showing only the sentiment for that specific set of elements

5.4 In-depth Sentiment

The In-depth page allows you to go deep-down in the sentiment data related to your classifications, for example brands, products, and people.

The main KPIs you’ll be using in this page is the Blogmeter Sentiment Index. The Index is calculated as the % of positive opinion minus the %  of negative opinions. The Sentiment Index is always a number between 100 (all positive) and -100 (all negative). The Sentiment Index gives a straightforward comparison between brands and products: having only one value index, it’s really easy to find out which brand has the best sentiment reputation.Sentiment Indepth

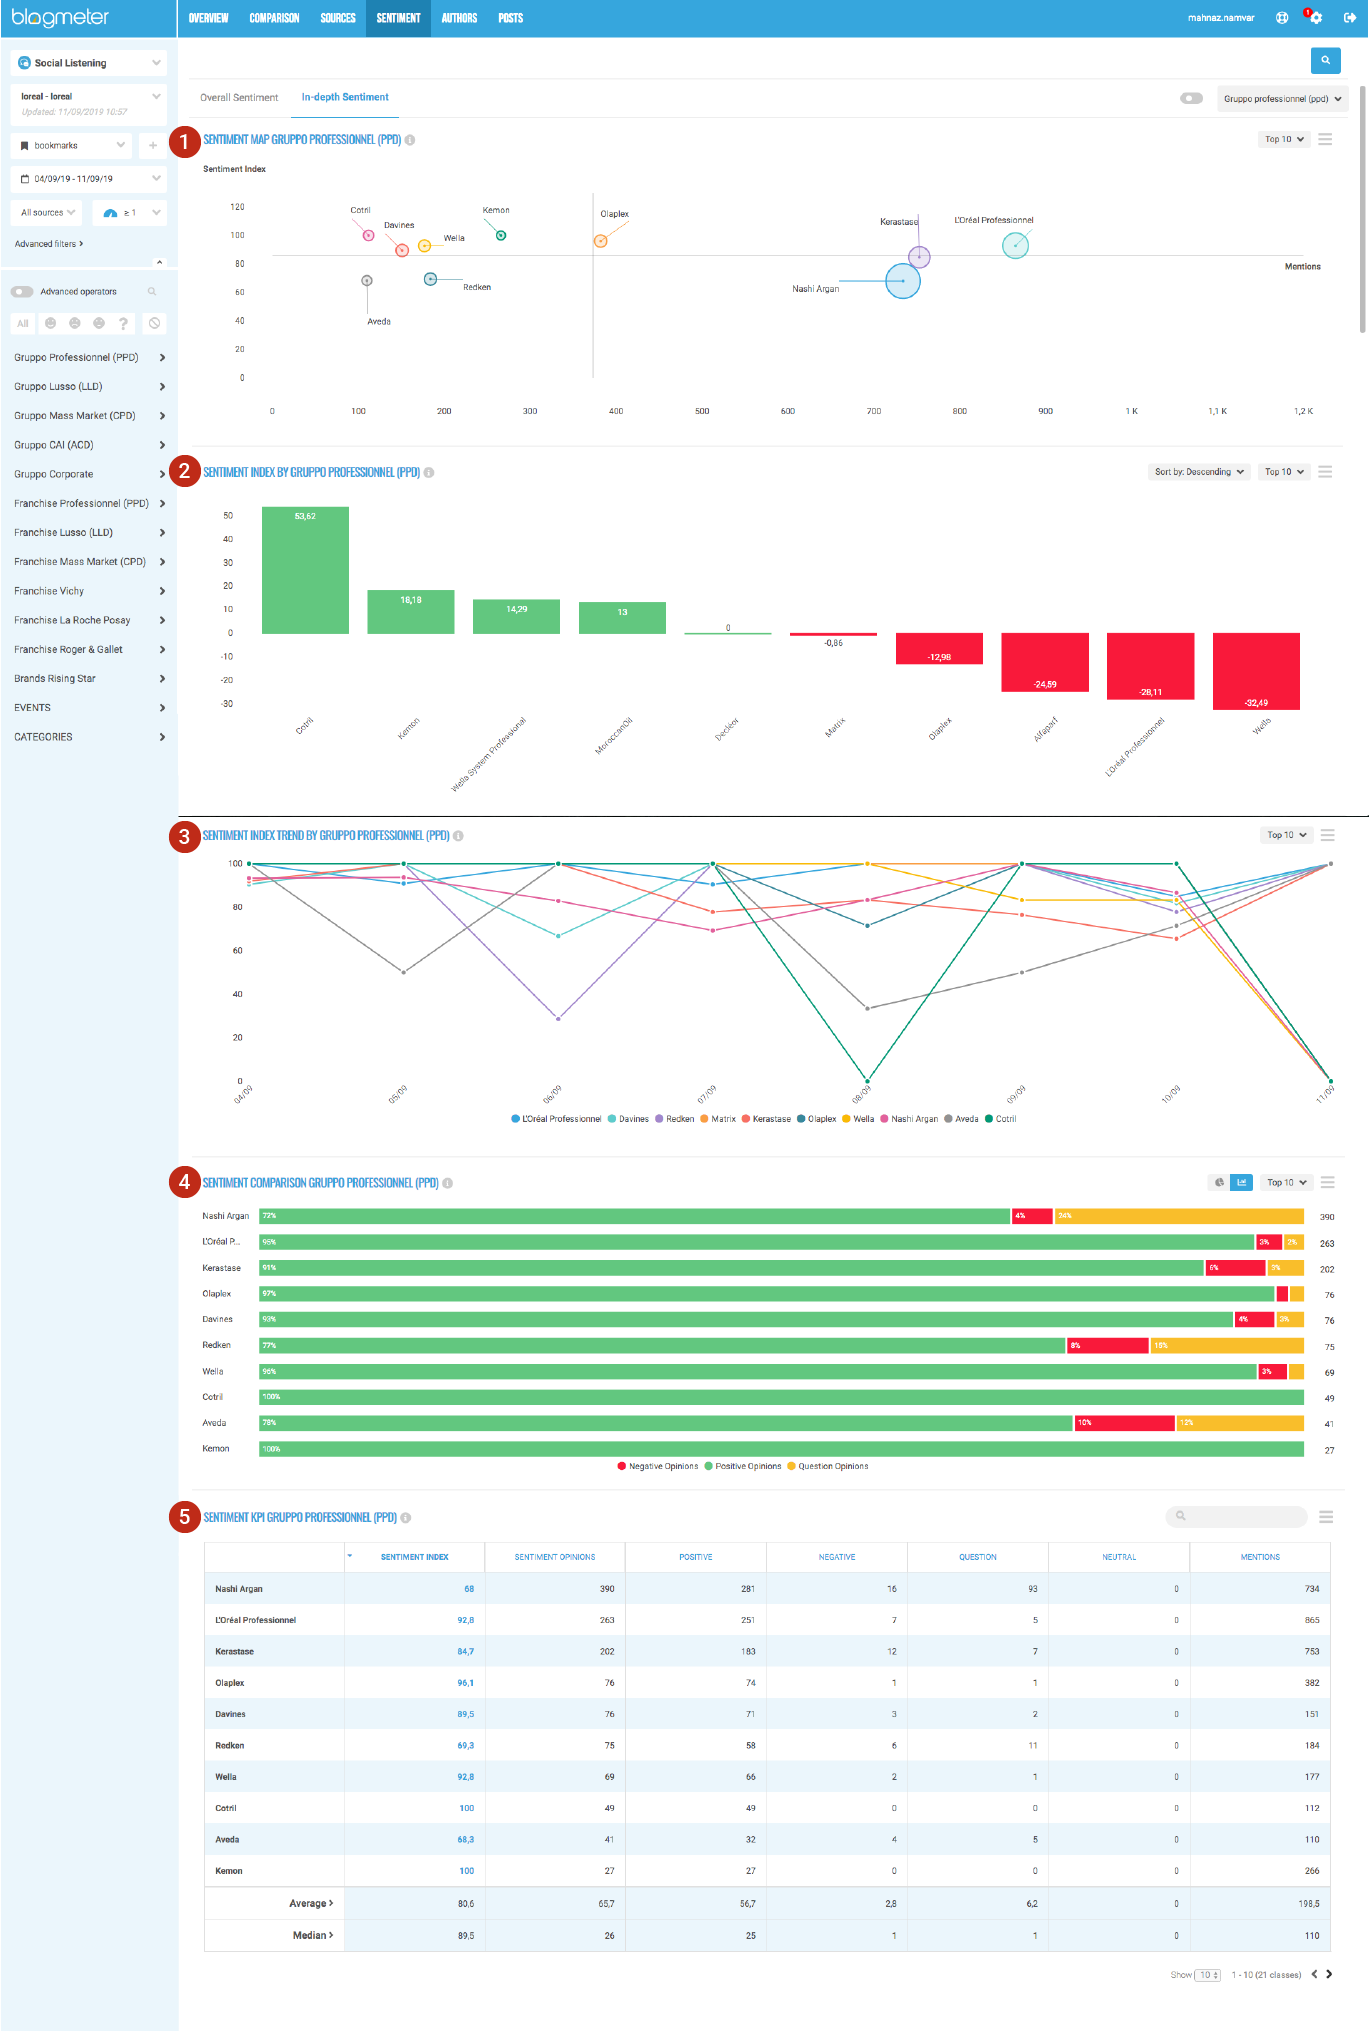
5.4 Social Listening – In-depth Sentiment page

FOCUS: In-depth Sentiment structure and main functions
  1. Compare brands and products reputation in a simple and effective chart. The Sentiment map shows brands positioning based on sentiment Index, number of mentions and number of opinions.
  2. Green or red? This sentiment Index graph lets you discover at a glance your brand reputation vs. competitors and industry.
  3. Compare the different brands over time for a specific tone in order to detect which brands stand out
  4. Compare the tone of conversations of top brands
  5. Compare the performances of each brand by Blogmeter Sentiment Index, number of sentiment opinions, details of every polarity of sentiment opinions (neutrals are optional) and number of brand mentions – all in a single chart. Benchmark the performances of your brand with the average values of the market.

5.5 Advanced sentiment filter

In addition to the possibility of modifying the charts through the classification filters, you can also customise your In-depth Sentiment page thanks to the Advanced Sentiment Filters, isolating opinions by specific class filters as follows:

  •         Click the “Advanced Sentiment Filters” button on the left side of the drop down menu
  •         Click the search box to select the specific class filters you want to focus your analysis on (specific brands, products, etc.)

Advanced Filters_5.4

5.5 In-depth Sentiment advanced filters


6. AUTHORS

Do you need to know which authors contribute the most to the conversations about your brands? Do you want to discover the location of the users talking about your brand and products? Do you want to identify the main influencers for your brand? Check the authors section of Social Analytics to find out more.

6.1 Authors page

With the Authors page you can discover the most active authors for your brand and/or products and profile them by gender and location. This page also helps you identify the most relevant influencers according to their follower base and engagement.

  •  Click the “Advanced Sentiment Filters” button on the left side of the drop down menu
  •  Click the search box to select the specific class filters you want to focus your analysis on (specific brands, products, etc.)


6.1_ Authors
6.1 Social Listening Authors page
FOCUS: Authors structure and main functions
  1. Find out the gender of the authors of the content you are analysing (based on our own gender guesser)
  2. Verify the location of your authors on Twitter
  3. Sort the authors by source, followers, mentions, engagement and gender and identify your main influencers.

6.2 How to identify your influencers

You can identify the influencers for your brand with the Authors Tab, by sorting authors as follows:

  • Sort the authors by followers to identify the most followed ones
  • Sort the authors by engagement to identify those who generate the highest reactions with posts about you/your brand
  • Sort the authors by mentions to identify those that generate the highest publications on your brands/products.


7. POSTS

Do you want to deep-dive into conversations about your brand and/or products? Do you want to identify the most engaging messages? Do you need to classify posts by sentiment or topics? Check the Posts section to find out more.


7.1 Posts page

The Posts page shows the list of posts related to your analysis, as well as a set of information on sources, authors, engagement, class filters, etc.


7.1 Social Listening Posts page
FOCUS: Posts main menu
  1. Recap of the main metrics: count of total messages, engagement and mentions of the documents you are analysing
  2. Click the square check-box to apply the same action on different documents. You can delete the selected documents; send all the posts selected via e-mail; expand or reduce long texts; add or remove a tag on the all selected posts.
  3. Click these buttons to enable or disable the view of original posts, comments and retweets.
  4. Sort your posts by increasing or decreasing order by date, engagement or Blogmeter Rank.
  5. Save a .CSV document with the documents list, show trashed documents and increase or decrease font size.

7.2 Post details

Social Listening provides you with the following data for each post:

7.2 Post Details
7.2 Post details
FOCUS: Post details
  1. Document’s source type. If the document is a comment you’ll see a speech bubble over the source icon.
  2. Source detail (i.e. name of a Facebook page or a YouTube channel)
  3. Blogmeter Rank (between 1 and 10) for the document. The Blogmeter Rank for comments is always 1. For further details on Blogmeter Rank, see Vocabulary
  4. Title of the post and content preview; click “Read more” to show the full text
  5. Date and hour when the document was posted
  6. Likes, comments, and total engagement. You can update the engagement and obtain live data clicking the double arrows button (Blogmeter updates the engagement data for 5 days by default)
  7. Name or nickname of the document’s author (only when available. Due to Facebook APIs rules, Facebook comments’ authors as well as non-business and non-creators Instagram authors are not available).
  8. Link to the document in its original source, outside the Blogmeter Suite
  9. Tags associated to the document

You can perform specific actions on the documents by clicking on the Post_conversation  button:

  •  perform social media management actions by sharing the post on Facebook or retweeting it
  •  visualise the thread related to a specific post by clicking the “View post’s conversation” button. The conversation will be displayed on a new window


7.3 Post thread

In the Post page you can read all the Mentions, i.e. all the relevant posts for your classification plus all the relevant comments where the classification keywords are quoted. In case you need to read all the available comments for a single post (relevant or not relevant), proceed as follows:

  • from the Post page: click on the “View posts conversation” button of the post/comment of your interest; or
  • from the Overview page: in the Most discussed widget, click the thread of your interest.


The Post Thread page will now be opened in a new tab of your browser.

Post Thread_7.3

7.3 Post thread


FOCUS: Post thread

1. On top of the page: the original post
2. Original post engagement. Update the engagement count clicking the double arrows button
3. Original post classification and sentiment opinions found in the document
4. Original post’s author
5. List of all the available comments. Read and classify all the comments tracked (relevant or not for your classes)
6. Authors of comments. In some case the name of the comment’s author may not be available (due to Facebook’s APIs Facebook, comments are anonymous).
7. Comments classifications and sentiment opinions. This classification is related to the comment text (and not to the original post). You can tag these comments as you like.


7.4 Engagement update

Blogmeter Suite automatically updates the engagement of all the posts in the platform for 5 days after their posting.

You can still update their engagement manually afterwards, by clicking the “Update engagement” button. The updated engagement will be displayed in a red box.


Engagement Update_7.2
7.4 Post engagement update

7.5 Posts tagging

One of the most frequent operations on the “Posts” page is post tagging. You can add both semantic tags (tags related to sentiment) as well as user tags (tags related to topics) as follows:

  1.  Select the posts you are interested in by checking the box on the left side of the title. The “Tag” button will be displayed on top of the post list
  2.  Click the “Tag” button and select “Add tag”
  3.  A pop-up window opens. This pop up window shows two different tabs: Semantic Tag and User tags. Use the “Semantic tag” feature to assign a specific tone to the opinions about your brands, products or topics contained in your document as follows
    • Choose a polarity
    • Choose the brand, product or topic related to that polarity
    • Click on add tag
    • Repeat from beginning to add more tags, then apply all the tags at once by clicking “Insert tag”


Semantic Tag Modal_7.3
7.5 Semantic tag modal

Use the “User tag” feature to classify the document in a specific class filter, as follows:

    • Choose the main filter containing the class you want to assign to the document
    • Choose the specific class filter you want to assign to the topic. It could be any of filters you have customised for you monitoring
    • Click “add tag”, then “Insert tag”

4. Add all the semantic tags and user tags that you need by moving from one tab to the other before completing the operation by clicking the “Insert tag” button.


User Tag Modal_7.3
7.5 User tag modal

7.6 Send Posts feature

The “Send Posts” button is a feature that lets you send specific posts in e-mail format. Use it to send posts instantly and to specific e-mail addresses. Proceed as follows:

  1. Select the posts you want to send by checking the empty box at the left side of the post title
  2. Click the “Send Posts” icon. A pop-up window opens
  3. Fill-in the boxes with the needed data:Review name: add a name to your posts review
    Order by: choose how to group your posts in the e-mail (by source, sentiment, rank or class)
    Review name: add a name to your posts review
    Order by: choose how to group your posts in the e-mail (by source, sentiment, rank or class)
  4.  Click “Send”


Send Post_7.3
7.6 Send posts modal

7.7 How to set alerts

The “Manage Alerts” function lets you set regular alerts on your topics of interest. This feature is based on the creation of bookmarks (see Bookmarks).

  1.  Create a bookmark for your topic of interest.
  2.  Click the “gear” icon on the top right side of the blue toolbar (next to the User Name).
  3.  Click the “Manage Alerts” function. The “Create New Alert” then opens.
  4.  Fill in the boxes with the needed data:
    • Alert name: select a name for your alert
    • Bookmark: choose the bookmark your alert will be based on (the documents displayed in the alert will be filtered according to the search parameters saved through the bookmark)
    • Frequency: Choose the frequency of your alert and sending time
    • Data period: choose the period for the data displayed in your alert (on which period your alert should be based)
    • Order by: choose how to group your posts in the alert: by source, sentiment, rank or classes
    • Don’t send if there is no data: no alerts will be sent if no new data is available in the Suite
    • Send with images: select this option to reduce the size of the file
    • Insert the name of the sender and its e-mail
    • Add a subject
    • Choose your recipient and eventual cc and bcc

5. Click  “Create” to save your alert. The final Alert will have the following format:

Alert

7.7 Alert layout


VOCABULARY

ALERT: Automatic sending of posts, comments and related data on a customized basis and in the form of an e-mail message. Setup your alerts using data bookmarks.

BM RANK (BMR): Proprietary rank ranging from 1 to 10 and indicating the significance of a source (where 1 is the least significant and 10 is the most significant).

The rank is calculated as follows:

  • Facebook, Twitter, Instagram, Google+, Youtube: The rank is assigned according to the number of fans/follower/ subscriber, and takes into account changes in their number over time
  • Other sources (blogs, news, forums, reviews): MozRank (https://moz.com/learn/seo/mozrank )
  • Comments will always have BMR equal to 1

CLASSES AND CLASSIFICATION FILTERS: Custom filters created in the left toolbar, under the default filters. They typically include, brands, products, topics, campaigns and owned channels

ENGAGEMENT: Sum of all the user interactions on single posts, including comments. It is based on Facebook, Twitter, Instagram, Youtube, Google+, News and Blogs.

It is based on:

  • Facebook: sum of shares, likes, comments and reactions
  • Twitter: sum of likes and retweets
  • Instagram: sum of likes and comments
  • YouTube: sum of likes, dislikes, comments and views
  • Google+: sum of likes and comments (soon to be deprecated due to Google+ shutting down)
  • News: comments to articles
  • Blogs: comments to posts

Please note that, due to Instagram API changes, for Instagram data the metrics shown are based on organic likes and comments only.

FILTER: Functionality that enables you to narrow down the focus of your analysis and isolate specific elements (brands, topics, languages, etc.)

GENDER (MALE/FEMALE): Find out the gender of the authors of the content you analyze. Based on a gender guesser made in Blogmeter.

IMPRESSIONS: Potential audience of a brand or topic, calculated as the sum of the followers of the publisher of at least one post. It is based on Facebook, Twitter,  Instagram and YouTube.

MENTIONS: N° of posts mentioning the keyword in analysis (i.e brands, products,…)  + N° of comments to these posts that also match the keywords in analysis themselves.

MENTIONS PER DAY: Daily average of mentions based on N° of days selected by calendar.

SEMANTIC TAG: Tags attributed to opinions contained in a post or comment to classify them by tone (positive, negative, question). Semantic tag can be automatic (based on Blogmeter’s Opinion Mining) or manual (done by our researchers or clients).

SENTIMENT INDEX: % of positive opinion minus %  of negative opinions. The index always shows a number between 100 (all positive) and -100 (all negative).

SENTIMENT OPINIONS: N° of sentiment opinions (positive, negative, questions) tracked in posts and relevant comments. Neutral are optional.

SOURCES: N° of web sources and social media where at least one relevant post has been found. Facebook, Twitter, Tripadvisor: these are all sources.

SOURCE DETAILS: List of single social profiles (for example, a Twitter profile or a YouTube channel), sub-forums or blogs that contributed the most to the conversations.

TAGS: Label assigned to a post, classifying it according to a specific class filter or sentiment. There can be semantic tags or user tags.

TOTAL MESSAGES:  N° of posts mentioning the keywords in analysis (i.e brands, products,…) written in the analysis period + N° of all the comments to these posts (in any date). Not all comments would be available to read in the Blogmeter Suite (for example, Instagram APIs does not enable comments download).

USER TAG: Tags attributed to posts and comments to classify them by customized classes (brands, products, topics).